Intro
The Skills Tree C++ Plugin offers a fast and easy way to incorporate a Skills Tree system in your project. This documentation will cover all the available features and How-Tos at the time of writing. Even though this is a C++ plugin you can leverage every one of its features in Blueprints. In case you’re a C++ programmer, the source code is fully documented so you can extend its functionality to match your needs.
Features overview
The Skills Tree plugin offers the following features:
- A base Skill class that can modified through Blueprints
- Skill stats for every skill
- Level stats table for every skill level
- Four different skill categories
- Instant Skill
- Casting Skill
- Passive Skill
- Passive looping Skill
- Various properties like skill categories (up to 256 different categories supported!), name and description
- Dedicated functions intended for BP overriding (Execute Skill and Casting Finished)
- A Skill Unlock Component (attached to every Skill), responsible for the unlock functionality for every skill
- Inside this component you can add stuff like Required Skills that need to be learned in order to learn the current Skill or Number of Required Skills in a specific category
- A Skills Tree Component that manages all of the above
- Save and Load functionality that stores the state of everything that the Skills Tree Component needs to know
Documentation Contents
- Integrating the plugin in your Project
- Skill class overview
- Skill Unlock Component overview
- Skill Tree Component overview
- How – Tos
Integrating the Plugin in your Project
To integrate the plugin inside your project, once you’ve added it into the engine, make sure to add the SkillsTreePlugin Dependency on the PublicDependencyModuleNames inside your [ProjectName].Build.cs file by writing the following line of code:
PublicDependencyModuleNames.AddRange(new string[] { "Core", "CoreUObject", "Engine", "InputCore", "SkillsTreePlugin"});Once complete this step, the plugin will have successfully installed into your project.
Skill class overview
Once you have successfully installed the plugin, you can create a Blueprint based on the Skill class:

Once you have created your Skill’s Blueprint, you can temper with every option available. Keep in mind that if you try to assign invalid values (for example negative Damage) the plugin will reset the assigned values into acceptable ones.
Here is a list of all the available properties for every Skill:

In case the Current Level of the skill equals to 0, the plugin will automatically mark this skill as locked inside the SkillUnlockComponent.
The Max Level of the skill will be automatically generated by the plugin, based on the assigned Level Stats Table.
Moreover, you can assign your own logic for your skill, using the custom Blueprint functions, designed specifically for that behavior:

Keep in mind that the Skills Tree component will automatically call these functions. The CastingFinished function will get executed if the skill is of casting type and the ExecuteSkill will fire when the player executes the skill.
Skill Unlock Component overview
In every skill, a SkillUnlockComponent is attached. This component is responsible for the unlock requirements for every skill. Here is a list of its properties:

Skill Tree Component overview
To integrate the Skill Tree component in your Character, simply add it to your character’s component:

Then, in the details tab, the only thing you have to specify is the Available Level Up Points value and the available skills (SkillsArray property) that this component will have. Keep in mind that you have to add all the skills that you want your character to have eventually.
In the following image, the character will have 5 skills at maximum:

Each element in the SkillsArray is a Blueprint class based on the Skill class that we have demonstrated in Skill class overview.
The SkillsTree component, contains the following custom Events, designed for Blueprint overriding so you can easily extend its behavior easy, through Blueprints:

Once you have provided some Skills and a number of Available Level Up Points in your character’s Skills Tree Component, the only thing left is to tell the component that wish you execute or level up a skill. The plugin will handle all the logic for you and will perform the necessary actions, if possible. This means that if the player attempts to level up a skill that it’s currently unavailable to him (based on your assigned properties in the SkillUnlockComponent) the skill won’t level up. Moreover, the SkillsTree component will perform necessary checks so the player can execute only the skills that he has learned so far.
Skill Tree Component Blueprint Functions
The plugin contains various exposed Blueprint functions so even if you have no C++ knowledge you can still create your desired Skills Tree System by writing your logic in Blueprints:

How – Tos
How to execute a skill
Currently, there are two ways that you can use in order to execute a skill. You can execute a skill by:
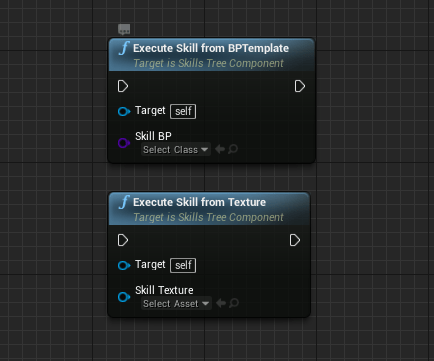
- Its Blueprint class, using the node “Execute Skill from BP Template”
- Its Texture, using the node “Execute Skill from Texture”. The Skills Tree component will execute the skill with the matching texture (used for UMG-binding mostly).
Please note that in both cases the skill must exist in the SkillsArray, in the SkillsTree component and must be unlocked before attemping to execute. In case something goes wrong, the skill won’t execute and a warning will appear in your Output log, notifying you about the problem and offering a possible solution. When the SkillsTree executes a skill, the following things happen:
- The skill is spawned in the provided relative transform. By default this transform is the player’s transform, if you wish to change that provide your logic inside the ExecuteSkill function inside your Blueprint.
- The function ExecuteSkill is called, from the Skill that has been executed.
How to create a casting bar
In order to create a casting bar, create a progress bar inside a User Widget. Then, create a function binding for its percent:

Then, provide the following logic for its return value:

In case you want the cast bar to appear only when the player is casting, bind the following logic to your progress bar visibility:

How to create an action bar
In order to create an action bar, you need a couple widgets and some Blueprint logic to match your UI needs. This documentation will provide a way to create some sample widgets, however you will find yourself changing this approach in order to match your game’s needs.
[button size=”big” color=”black” link=”https://github.com/orfeasel/Skills-Tree-UE4-Plugin-Docs”]Click here to download the Blueprints that follow[/button]Before you create an action bar, I would recommend to create a user widget (named UW_ExecuteSkillButton) that it’s going to represent each Skill Button. Here is a simple way to create that widget:
- Create an empty widget (delete the Canvas panel if it is added by default)
- Add a button as a parent
- Add an image inside the button make sure that the horizontal and vertical alignment are set to fill:

Then, provide the following logic inside your Button’s click event:

Before we dive any further, create a custom event in your ExecuteSkillButton widget in order to bind the image from each available skill:

We’re going to call this function from the widget that will contain all the ExecuteSkillButton widgets in a moment.
Now that we have setup the skill execution widget, create a new user widget and:
- Provide a uniform grid panel
- Place some UW_ExecuteSkillButton inside that panel and assign a different column value as the following image suggests:

Once you complete this step, make an array of UW_ExecuteSkillButton references and inside the construct event of your graph add the UW_ExecuteSkillButton references like so:

Then, provide a custom event that calls the Assign Texture function that we created in the UW_ExecuteSkillButton and call it after you have added all the necessary elements to your ExecuteSkillButtonsArray:

How to create an unlock rule for a Skill
In order to modify the unlock criteria for a particular Skill, open up the details panel of its SkillUnlockComp and make sure to lock the skill first. Then, you can choose the following unlock rules:
- A number of skills is required in a number of categories
- Particular skills are required to be in a specific level before the skill can be unlocked
- A combination of the above
Here is a screenshot from a Skill that can be unlock if the player has learned at least 4 skills in Nature category, 1 skill in Earth category and has leveled up the CastingSkill to a level of 1 and the Test skill to a level of 2:

How to unlock a Skill
The plugin offers two ways to unlock a skill. You can use the following nodes:
- Unlock Skill by Blueprint Class (found in the SkillsTree component)
- Unlock Skill by Texture (found in SkillsTree component)

The skill will be unlocked only if the unlock criteria that you have assigned in the UnlockSkillComponent are met. If the unlock fails, the plugin will display a warning in your Output log, stating the problem. If the skill unlocks successfully, the plugin will increase its level by 1.
How to unlock skills by default
In order to enable a skill by default, change its CurrentLevel to a value of 1 and assign the stats you want your skill to have. If this skill is a passive one, the plugin will spawn that skill when the player starts the game.

How to configure skill levels
In order to configure multiple skill levels you need to create a Data Table. Once you’re prompted to choose a struct for it, choose the SkillStats struct:

Once you’ve assigned the Level Stats table into your Skill’s details panel, the skill class will automatically configure its max level:

Make sure that each line has an integer as a Row Name. The Row Name corresponds to the Skill Level.
How to level up a skill
In order to level up a skill, you have to unlock it first. Then, you can use the following nodes, provided in the SkillsTree component:

The SkillsTree component will not attemp to unlock the skill in case its Available Level up Points are equal (or lower) than 0.

Note that the SkillsTree component contains a On Skill Level up event that will automatically fire when you have incremented a skill level. If the skill cannot be leveled up any further, a warning will appear in your Output log.
How to add your own skill category
To add your own skill category open up the Skill.h file and inside the ESkillCategory, right below the Illusion skill category (line 33) type in the following line:
SC_YOUROWNSKILLCATEGORY UMETA(DisplayName="The Name you want the category to have in the Editor"),Don’t forget to add the comma right after the parenthesis and do not add your category after the SC_LASTCATEGORY. The plugin supports up to 256 different skill categories.
How to stop a casting skill explicitly
In order to stop a casting skill explicitly (for example if your player is moving or takes damage). You can call the Stop Casting function located in SkillsTree component:

Please note that you can assign your own logic to On Skill Stop Casting event, located in the Skills Tree component. This event will execute automatically after the Stop casting takes place.
How to save and load learned skills
In order to save and load your character’s progress, simply call one of the following functions, located in the Skills Tree component:
